


Button on the Site
To maintain consistency for users when working with OAuth 2.0, you can install a special button on the site.
![]()
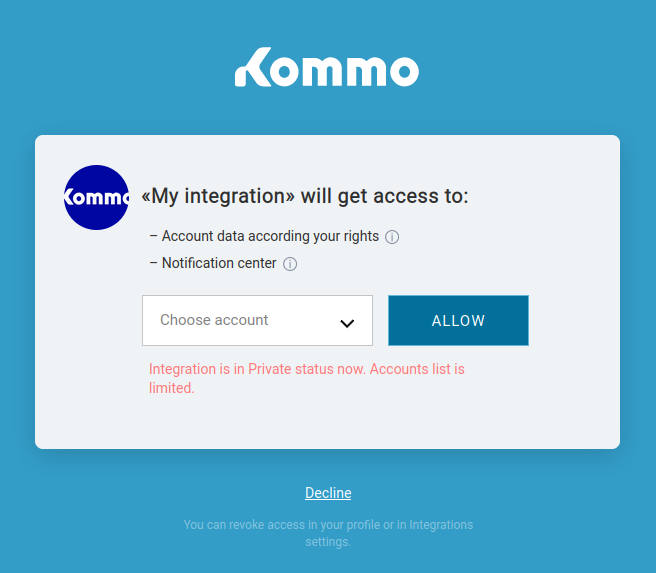
When clicking on the button, the user will see a page with the details of your integration: icon, name, and permission scope. In this page, the user gets to choose between the accounts where they are a member, and agree to authorize the integration in that account.
If access is granted, the user will be redirected to the Redirect URI page with the GET parameters: code, referer, state. Read more about this process in the ‘Step-by-step Example’ guide.
To implement the button for an integration, you need to place a small JS code in the place where you want this button to be shown.
<script
  class="kommo_oauth"
  charset="utf-8"
  data-client-id="xxxx"
  data-title="Button"
  data-compact="false"
  data-class-name="className"
  data-theme="light"
  data-locale="en"
  data-state="state"
  data-error-callback="functionName"
  data-mode="popup"
  src="https://www.kommo.com/auth/button.js"
></script>
Parameters
| Parameter | Description |
| data-client-id | The integration ID |
| data-title | The text that will be displayed to the user on the button (By default, “Countinue with Kommo”) |
| data-compact | If this value is set to true, the text on the button won’t be displayed, only the Kommo logo |
| data-class-name | Class that will be set to the button element on the page |
| data-theme | Button theme
|
| data-locale | A language of the button(en/es/pt/id).The text of the button (by default, “Countinue with Kommo”) will be translated to the chosen language if a custom text wasn’t passed. The authorization page that opens upon click will be translated into the chosen language (en by default). |
| data-state | The status parameter to be passed to the modal window |
| data-error-callback | Name of the function that will be called if the user declines to grant access to the integration. This function should be on a global scope. As input, the function will receive an object with keys: client_id (integration id) and error (error code). At the moment, there is only one error code: access_denied, if the user declined to grant access. |
| data-mode | Available parameters: popup and post_message. For popup, the opened window will be closed, and the redirect to the Redirect URl will be done in the main window, from which the modal window was opened. For post_message, the redirect to the Redirect URI will be done in the opened window, and the user will need to close it after processing the authorization code . Also, you can report information about the status of the action to the main window using the postMessage function. |
To make it possible to use the button without opening a modal window, or to change it, you can study the code.